Showing posts with label Boho Bags. Show all posts

Monday, February 10, 2020

Weaving Fabric Strips into a Bag, Part #3

 Woven bag is finished, and it's fabulous!


What a fun project with fun results! This OOAK bag can take you from Casual Fridays to Saturday Night Parties! And knowing its history, makes it even more fabulous!

I have to admit that I slowed down on this project after part #2. The lining needed to be shiny & bright, and I wanted a tone on tone print. However, I couldn't find anything like that in my fabric stash, nor did I find the perfect fabric at the stores. The fabric I ended up with is a basic polyester satin from my local Hobby Lobby. It was on sale and thick enough to be durable.

Ready to cut the lining fabric.

The inside pocket is black velvet with blue fabric trim. That trim matches one of the blue fabric layers woven into the bag, so there is continuity with the design. The pocket had to be hand stitched to the lining because I forgot to machine stitch it in place before I seamed up the side & bottom of the lining. (Maybe next time I'll remember to attach the pocket BEFORE I sew up the lining.)

Stitched pocket, stitched lining & fabric strip for the strap.

Parts of the woven outside needed to be stitched to stabilize the fabric strips. Good old fashioned hand stitching came to the rescue. I felt that necessary since I plan to sell the bag. I believe in making quality products even if it does require doing the little extra steps.

If you're curious about the strap, it's made from a 4" strip of black velvet that belonged to the black velvet skirt (part #1).  It was easy to sew, then I machine stitched the strap onto the outer bag. The next step was to hand stitch the finished lining to the outer bag.

Embellishing the bag excited me, and after playing with buttons, I realized that the embellishments needed to be kept at a minimum and not distract from the beautiful woven fibers. Plastic & metal buttons cheapened the look, and so did this big rhinestone brooch.

Choices...

This brooch is too gaudy!


This button is too garish!

This glass button that I picked up in Santa Fe, New Mexico felt just right. The black circle stripes on the turquoise glass compliment the black & blue lines on the bag.  A few faceted blue crystal beads were chosen for the final touch. Each bead is securely stitched, and the threads are knotted several times to prevent the beads from falling off. That needed to be done because this bag is going places!

Artisan's glass bead & faceted glass beads, hand stitched.


The finished bag measures 9" x 7.5" with a 52" crossover strap. It's fully lined with turquoise satin & one inside pocket, and a magnetic snap closure snaps it shut. The snap is positioned in the middle of the bag.
Bag's interior view.

This bag turned out to be most charming and very, very soft. It's lightweight, but very durable. I can see a bright future for it, and some lucky lady will love all the compliments she receives every time she carries it. She can tell her admirers that it is One of a Kind and that she heard the artist who made it is a legend in her own time. Well... a girl can dream, can't she??? 💕😊💕

Back side of the bag. Cute streamers of yarn & ribbon!

Inside view showing magnetic snap & trimmed pocket.

Finished woven bag with Artisan's glass button... Viola!


@Copyright 2020 Cindy Lou Hodges All Rights Reserved.

Tuesday, January 28, 2020

Thrifted Bag Redo


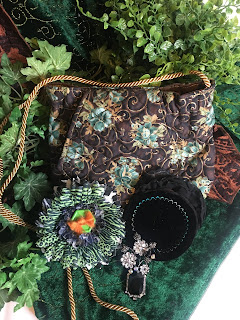
Revamped bag with OOAK background for Victorian brooch. Beautiful!

Cute fabric bag that needed a makeover. I forgot to take a picture of what it looked like when I found it, but it was rather sad. The top of the bag had elastic, so the bag gathered at the top scrunching up the opening. I removed the elastic and pressed the bag top. The original strap was turquoise braid, and it was only 30" long.

I removed both the turquoise braid & elastic by ripping open the seams on the sides, then sewed on a 52" gold cord. Now the bag is a crossover bag, and it doesn't that "scrunchy pouch" look.

The fold over flap is a nice feature, but it was plain. I chose to add a Victorian flare with the rhinestone brooch. It looked great, but wasn't quite the look I wanted. So I made the black velvet circle with decorative stitches using variegated turquoise thread. Nice! I went with the sheer ruffle accent on the black medallion, giving it one more feminine touch.

There were no pockets on this bag. A girl must have pockets, so I cut up a quilted pillow sham (Thrifted, of course!), and chose a gold cotton fabric that I purchased in Las Vegas, New Mexico at my favorite shop on the square... Thread Bear. (Beautiful quilting fabrics & a fun place to visit!) https://www.threadbear-nm.com/   The gold fabric has a gold metallic design in it, and that compliments the gold thread in the outside fabric.
Back Side with new pocket: recycled fabric, new lace, vintage button.

Newly added pocket out of recycled pillow sham.
I'm pleased with the pockets... one inside for incidentals & one outside for the cell phone. They really complete the purse and make it much more functional!

Sometimes I feel like doing the unexpected, and the additional flower brooch is just that. The whimsical green, white & black brooch is layers of animal printed fabric. And the center button & bow have nothing in common with the bag fabric, nothing other than, I like them, and I like them together.

So, this particular bag has several personalities  the Casual look...
Revamped thrifted bag without embellishments.

 Victorian Look #1...
One rhinestone brooch added...

Beautiful brooch, but gets lost on top of the busy printed fabric.

 Victorian Look #2...
Revamped bag with OOAK background for Victorian brooch. Beautiful!

the Whimsical look...
Revamped bag with crazy animal print brooch... one of Cindy Lou's Wacky Woses!

Backside of Wacky Wose brooch.

So many choices...


 What a fun, easy project. I played with it for a couple of sessions. Still don't know which look is my favorite. I love them all! Which one is your favorite?
Revamped bag with OOAK background for Victorian brooch. Beautiful!


@Copyright 2020 Cindy Lou Hodges All Rights Reserved.

Monday, January 20, 2020

Weaving Fabric Strips into a Bag, Part #2

 Weaving Fabric Strips into a Bag, Part #2

Last week's post took us through the process of weaving fabric strips onto a cardboard loom. Hemp string was the base (warp), and assorted 3" wide fabric strips were woven over & under the hemp. The combination of colors & textures turned out to be beautiful!

The next step was to remove the cardboard. Since this was my first time to weave both the front AND the back, I wasn't sure that it would all stay together without the cardboard.

However, I am very happy to report that it worked! The cardboard resisted due to the tight weaving, but after a few minutes of effort, the cardboard easily slid out, and I had an intact, solid, beautiful bag!


Here it is... no more cardboard!

Side #1 Fabric Strip Bag without the cardboard loom.

Side #2 Fabric Strip Bag without the cardboard loom.

Top view of Fabric Strip Bag, looking inside the bag.

Success! Hooray!!! 

I'm smiling from ear to ear that it was so simple to make this OOAK bag! It's ready for the finishing touches. First thing will be the lining, and the rich velvet & rich colors deserve something really pretty. A satin fabric with a sheen would be lovely. I'll add a strap or handle, probably a strap, and trim up the outside ends. It's going to be fabulous, I tell ya'... and I am one happy crafter!

Stay tuned for the final steps to this project... Part #3, Weaving Fabric Strips into a Bag.
You're gonna' love it!

Cindy Lou

@Copyright 2020 Cindy Lou Hodges All Rights Reserved.

Blue Shadows (On the Trail), 1986

Buckle up, partners, for this sparkling rhinestone and soothing lullaby brought to you by The Three Amigos! Actors Steve Martin, Chevy Chase...